Pages

Search This Blog

Showing posts with label gift. Show all posts

Tuesday, April 15, 2014

Sock Elephant Baby Gift

I took a little break from the quilts in progress...

in order to make a Baby Shower gift for a young friend...

This is Edward the sock elephant.

Also made a Mini diaper bag from Elephant print cloth

Edward is sitting in the nursery organizer; a place to keep diaper change items together.


 Directions to make a sock elephant are found in Sock and Glove by Miyako Kanamori.
Now back to the quilts...

Saturday, October 26, 2013

Blue and White Chevron Quilt, part two

To read about the beginnings of this quilt click here.

When my granddaughter saw a photo of just the pieced top, unquilted, said she would really like to have it for her birthday gift this year.
No borders yet.

Blue "crackle" print for the back.

I had originally intended to free motion quilt circles and meanders on each chevron...but I also wanted to be sure there was quilting near to each peak and valley of the chevron.
Intentionally not quite "in the ditch" stitching along the edges of each chevron.
I wanted to use a variegated blue thread and wanted it to show up.
Once all the zig and zag lines were sewn...I did a sample free motion test with my favorite machine for that.
"Daisy Mae" did a wonderful job on K-A's quilt (on left)...but her speed controller has developed some hesitation.
I need dependable control, so she needs a trip to the fix-it man!
My sewing machine repair man was on vacation...and I did not want to wait a week or more to finish the quilt...and the chevrons are only 2 inches wide so what I have done is "enough" ...so I went ahead with the binding.
 I cut several 2.25 inch bias strips of the same cloth as the borders, sew the strips end to end until I have enough to go around the quilt. Fold the bias strip in half, length-wise and sew on the top side of the quilt, matching raw edges (do not trim the excess back & batting edges yet).

When the bias binding  is sewn all the way around, then the extra edges are trimmed off to look like this.

Now the folded edge of the binding is folded to the back of the quilt and hand stitched with a ladder stitch.


Hand closing the binding on the back...yes I need reading glasses to sew tiny stitches, and an extra light helps too!
Yes, I am left-handed, so this photo might look odd; I sew from left to right.

I made the label by tracing over text printed off my computer.

All washed and ready to gift wrap!

Monday, December 24, 2012

Keeping Busy!

Just a few photos... sorry, no instructions this time!

Baby bag for a friend to give to her relative - pockets inside

Front of bag, with handles

Fleece slippers made from moccasin directions

link to directions for moccasins

One more sock monkey and a Lady bug!

Fleece poncho - extra small


Fleece poncho - small
Now where is my wrapping paper???

Thursday, December 13, 2012

Quick & Easy Bandanna poncho

I have 7 grand daughters... and I like to make gifts for them. Birthdays are fairly easy, they come one at a time (except November 29 & 30!). Christmas presents all come due on the same day! So here is an idea for a quick and easy girly gift.
Buy 4 matching bandannas; this brand works well.

Some bandannas have printed words instead of labels.

I do not like the words, but I do like the overall design.
I'll set these aside for later, then work out a way to deal with the lettering.
What ever brand you choose, I suggest washing and drying your bandannas before construction begins.
Snip out the labels as close as possible to the hem.

These bandannas are not square.
The cross wise grain edge is a different length than the length wise grain, and is a little stretchy.

This difference in size is the reason I made sure to sew cross grain edges to cross grain and length wise to length wise.
Sew the bandannas together to form a large square leaving some of the center open.
This is 3 inches... not enough to make a head size opening.
Here are all 4 bandannas sewn with the 3 inch opening... had to open it up to 4 inches.
A reasonable opening, seams pressed flat, and the neck opening creased.
I could just sew these points down and be done, but.....
While photographing the green version I noticed the shadow effect.
And I don't like the look of that point.
The points were serged off after the neck was top stitched.
If you do not have a serger, you could just cut them off with pinking shears.

I serged these before top stitching the neck edge.

Finished neck.
Finished green poncho.
Now what about those bandannas with lettering?
My first thought was to sew the seams beside the letters...
sorry the red thread is hard to see.

The resulting huge seam allowances were problematic!
Marked the corners in preparation for serging; measure from the printed pattern NOT the hem.
Cheap bandannas have very uneven hems!

One bandanna trimmed, serge the other 3 and proceed as with the pink/green set.
At this point I realized that the "Quick & Easy" quotient just went down by a factor of 16! 
And I have 5 sets of this brand of bandanna.
4 edges x 4 bandannas x 5 colors = 1 busy Grandma!
I did seriously consider returning some bandannas in favor of the other brand, but.....
the colors available.....
and the print.....
I think I will keep them after all and just GET BUSY!

Monday, December 3, 2012

Argyle Monkey - how to make it

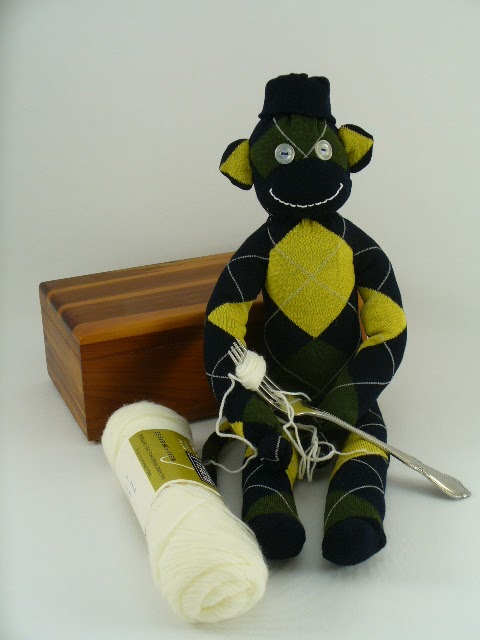
I wrote a sock monkey tutorial  and used some various socks for comparison...
My grand daughter saw a photo of these argyle socks....


and asked if they had been made into a monkey yet.  Then she asked if she could have it for her birthday.  Of course grandma said "YES!"  So here is the process I used to make her monkey.

Usually I use the toe of the sock for the head of the monkey, but argyle socks don't look good in the toe.
So the cuff edge of the sock is used for the head of the monkey... this requires some investigation...
This sock has a row of stitches that can be removed to open up the cuff with out unraveling the sock.

Stitches being snipped.

One cuff opened... I did open both ...and then later wished I had not. One could have been left and used for the monkey's hat.
The foot of the sock is stitched for feet and legs of the monkey, just up to the heel of the sock.

Here is the sock stitched and cut apart for legs.

Here are the legs and body turned right side out ready for stuffing.

This is my favorite stuffing for monkeys, soft and cuddly!
To stuff the legs... add small amounts of stuffing and work them all the way down to the end before adding more stuffing. If the leg is lumpy, roll it between your palms like clay and gently even it out.
Stuff the whole body and close the top of the sock.
Monkey's head being closed, cuff becomes hat.

The second sock is cut into various pieces. First, cut the heel out like this.

Baste the raw edges to the inside and embroider a mouth (inside photo)

Here is the mouth, I like a simple smile.

Sew the mouth along the upper edge first.

Then add some stuffing and finish sewing the lower edge.
Remove basting stitches if they are noticeable.


A line of running stitches for the neck.
I like to begin and end under the monkey's chin... hides the knot!

I like to use this portion of the foot for a tail.  Can you see the line of stitches that curves along the fold?


Cutting the tail loose AFTER stitching it.


Turning tail right side out with the help of a bamboo chop stick.

Tail, ready for stuffing.
The foot piece after tail is cut off is a good place to cut ears.

If you want dark ears, just trace around a small object (like a thread spool) and stitch before cutting.

I wanted fancy ears, so I stitched a semi circle around the yellow triangle.

Here are the ears, one turned right side out.
Fold the raw edge in and sew a few stitches to hold it closed.
The upper portion of this sock becomes the monkey's arms.
Think carefully about where to cut if you want symmetrical arms!

Pin the seam matching the argyle lines carefully.

Sew a line of running stitches in one end of the arm. I chose the cuff end.
I use a dowel to help keep the arm open while stitching.

Pull the running stitches tight and close this end of the arm.

Arm turned right side out.

I like to add a line of stitches for a wrist, and form a hand.
Two symmetrical arms, with hands.
The argyle pattern gives me a nice placement for the arms.

If the arms are stitched at an angle, then they will not stick straight out.
I used the angle of the argyle pattern for a stitch guide.
The sock seam in the monkey's foot is hidden by folding and stitching a tuck to form the monkey's ankle.
The foot on the left is folded and stitched, the other is straight.
Ears sewn on each side of the head - forgot to take photo of the sewing!


Eyes help give her some personality...... she asked me to make her a pom-pom for her hat. I have been wanting to try out the mini pom idea I saw on Pinterest ... so here it is!
Wind yarn around the tines of a fork. Tie in the middle.

Removed from fork, ready to be cut open.

Half cut

All cut open, but not yet trimmed neat.

Ready to sew onto her hat.
A happy monkey, waiting for the Birthday!