Many years ago.....
some one noticed that our church had enough kids to have our very own Little League baseball league. I will be rather vague about the details 'cause I don't remember everything, and wasn't on the "planning committee". Not a lot of pressure to perform, not a lot of extra practice time, not a lot of games every night of the week; just an opportunity to learn a team sport on Saturday morning. The teams have the entire range of ages (7 to 12 I think!) and they work together, the older ones teaching the younger ones.
So.... in the early spring, when sign-ups are announced, the kids are excited.... "who's team will I be on this year? what color will our shirts be? how cool will our hats be?..."
So this year someone gave me the idea..... OK... it was my daughter who first said it might be possible to do this! She had been given a few extra T-shirts from past years, and realized it might be enough to make a T-shirt quilt to give to our "Commissioners" as a Thank you for all the years they have worked to keep Pilgrim Baseball going!
Several families donated hats and shirts in order to make this work! Some of the kids love their shirts so much, they were not ready to give them up yet.
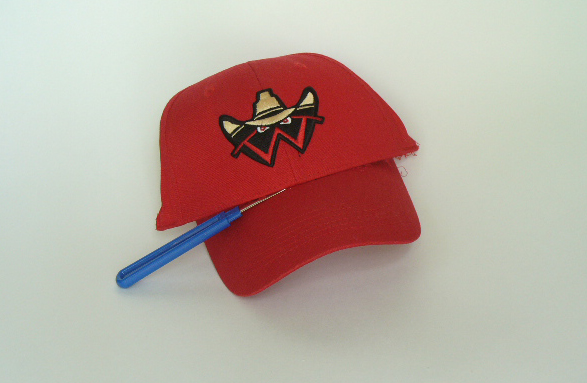
Since the "coolest" part of their team uniform was their hats, I wanted to find a way to make them part of this special quilt.... so I started de-constructing one to figure out if I could get the LOGO into a form that could be sewn into a quilt.....
I thought I might need every bit of cloth below the logo, so I did not cut the bill off, I removed the stitches, then cut the logo free from the rest of the hat.
When you look at the inside of this one, notice that the logo is embroidered in the hat cloth and NOT the stabilizer material.
 |
| These were embroidered THROUGH the stabilizer! A BEAR to remove! |
 |
| Most of the stabilizer removed easily |
 |
| Vent eyelets were stitched through the stabilizer, pull it apart thread by thread. |
 |
| A few of the hat scraps! |
A total of 27 hats were taken apart and the logos re-appliqued to T-shirt squares (photo comes later).
Shirt logos came in 2 basic sizes...
 |
| Small logo beside button placket, 6 inch max. |
 |
Large logo below button placket, 12 inch square
(sleeve logos in background will make 6 inch squares) |
I wanted something special, just the right cloth, to pull all these colors and different size squares together... and I found it!
 |
| What better cloth for a baseball league quilt! |
So.... let's cut some squares.....
 |
| Button placket being taken apart to get enough cloth for a 6 inch square! |
 |
| Iron on t-shirt interfacing to keep the knit cloth from stretching too much. |
 |
| Two hat logos & two color squares to form a large square |
 |
| Printed baseball cloth cut in 2 inch strips for sash (between squares) |
 |
| LOTS of sashing cut up! |
 |
| Two small squares and sash (wrong side) |
 |
| Right side up |
 |
| Both vertical sashes sewn first, then horizontal sash to join them. |
 |
| The knit cloth "behaves" better if the sash is on top when sewn. |
Next time.... layout of all those squares!
click here to continue to step 2.


No comments:
Post a Comment