I wrote a
sock monkey tutorial and used some various socks for comparison...
My grand daughter saw a photo of these argyle socks....
and asked if they had been made into a monkey yet. Then she asked if she could have it for her birthday. Of course grandma said "YES!" So here is the process I used to make her monkey.
 |
| Usually I use the toe of the sock for the head of the monkey, but argyle socks don't look good in the toe. |
So the cuff edge of the sock is used for the head of the monkey... this requires some investigation...
 |
| This sock has a row of stitches that can be removed to open up the cuff with out unraveling the sock. |
 |
| Stitches being snipped. |
 |
| One cuff opened... I did open both ...and then later wished I had not. One could have been left and used for the monkey's hat. |
 |
| The foot of the sock is stitched for feet and legs of the monkey, just up to the heel of the sock. |
 |
| Here is the sock stitched and cut apart for legs. |
 |
| Here are the legs and body turned right side out ready for stuffing. |
 |
| This is my favorite stuffing for monkeys, soft and cuddly! |
To stuff the legs... add small amounts of stuffing and work them all the way down to the end before adding more stuffing. If the leg is lumpy, roll it between your palms like clay and gently even it out.
Stuff the whole body and close the top of the sock.
 |
| Monkey's head being closed, cuff becomes hat. |
 |
| The second sock is cut into various pieces. First, cut the heel out like this. |
 |
| Baste the raw edges to the inside and embroider a mouth (inside photo) |
 |
| Here is the mouth, I like a simple smile. |
 |
| Sew the mouth along the upper edge first. |
 |
Then add some stuffing and finish sewing the lower edge.
Remove basting stitches if they are noticeable. |
 |
A line of running stitches for the neck.
I like to begin and end under the monkey's chin... hides the knot! |
 |
| I like to use this portion of the foot for a tail. Can you see the line of stitches that curves along the fold? |
 |
| Cutting the tail loose AFTER stitching it. |
 |
| Turning tail right side out with the help of a bamboo chop stick. |
 |
| Tail, ready for stuffing. |
 |
| The foot piece after tail is cut off is a good place to cut ears. |
 |
| If you want dark ears, just trace around a small object (like a thread spool) and stitch before cutting. |
 |
| I wanted fancy ears, so I stitched a semi circle around the yellow triangle. |
 |
| Here are the ears, one turned right side out. |
 |
| Fold the raw edge in and sew a few stitches to hold it closed. |
 |
The upper portion of this sock becomes the monkey's arms.
Think carefully about where to cut if you want symmetrical arms! |
 |
| Pin the seam matching the argyle lines carefully. |
 |
Sew a line of running stitches in one end of the arm. I chose the cuff end.
I use a dowel to help keep the arm open while stitching. |
 |
| Pull the running stitches tight and close this end of the arm. |
 |
| Arm turned right side out. |
 |
| I like to add a line of stitches for a wrist, and form a hand. |
 |
| Two symmetrical arms, with hands. |
 |
| The argyle pattern gives me a nice placement for the arms. |
 |
If the arms are stitched at an angle, then they will not stick straight out.
I used the angle of the argyle pattern for a stitch guide. |
 |
The sock seam in the monkey's foot is hidden by folding and stitching a tuck to form the monkey's ankle.
The foot on the left is folded and stitched, the other is straight. |
 |
| Ears sewn on each side of the head - forgot to take photo of the sewing! |
Eyes help give her some personality...... she asked me to make her a pom-pom for her hat. I have been wanting to try out the mini pom idea I saw on Pinterest ... so here it is!
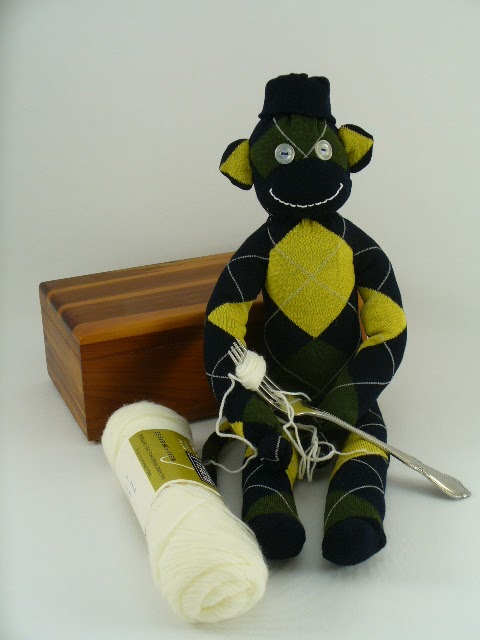
 |
| Wind yarn around the tines of a fork. Tie in the middle. |
 |
| Removed from fork, ready to be cut open. |
 |
| Half cut |
 |
| All cut open, but not yet trimmed neat. |
 |
| Ready to sew onto her hat. |
 |
| A happy monkey, waiting for the Birthday! |


No comments:
Post a Comment